

Rachel Moore, creator of Sparrow Moose Media, is studying to earn her Bachelor's of Photography at Nossi College of Art. She consistently brings fresh and thoughtful ideas to her photo world and helps mentor other students when they have questions or are struggling with an assignment. In the fall 2019 semester, she also was a student leader on a location fashion shoot at the Nashville Farmer's Market.
While we are all stuck inside our homes (hopefully not for much longer!), we wanted to repost a blog she wrote a couple of years ago about ways photographers can capture a studio-quality vibe at home AND on a budget (she promises $10 or less). You may even already have many of her suggested items at home.
At Nossi College, we believe in do it yourself options, because we all know what it means to live on a budget. It is amazing what you can create with simple tools and tricks at home (we believe in it so much that advanced photo students take a DIY photography class in the bachelor's program).
How to Create A DIY Photography Studio (For $10 or Less!)
Photos and Blog article by Rachel Moore of Sparrow Moose Media, edited for clarity.
THE FINAL PICTURE ONLY COST ME $5!
That's right! Photography doesn't have to be expensive! So, here is how you can get some clean product photos for your catalog, website, or portfolio!
What you will need (most of these items were purchased at Dollar Tree): I am also assuming you already have a camera (mobile phones work for beginners) and a light source (we are looking at you, lamp).
Here are the items you will need:
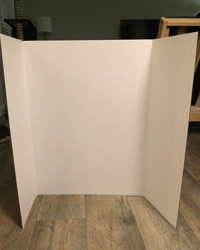
DIY Photo Backdrop
Display Board: This will act as your backdrop. White is typically a good color that can easily be edited, however black is a great alternative. Feel free to get creative with it, though. If you want to have a unique look, grab unique colors!
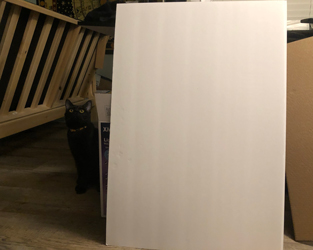
DIY Light Diffuser
Foam Core Board - one or two: This will act as your light diffuser. Side note: If you do not already have a reflector, foam core can be wrapped in aluminum foil for a DIY light reflector!
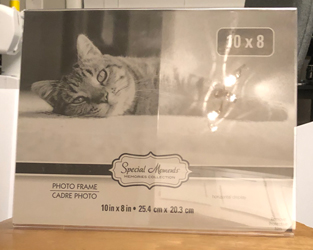
DIY Light Reflector
Glass Frame: This is to act as a reflective surface. You will lay something black underneath the glass. The bigger the product, the larger the glass surface. For smaller products (i.e. cosmetics), an 8 x 10 will offer plenty of space. You actually will not need the frame, just the glass. Side note: Black Plexiglass also works for this, and you can find it online for $10!
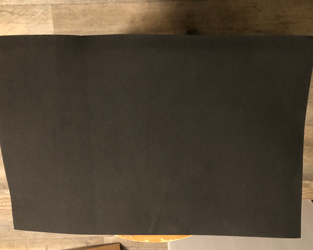
Black Craft Foam or Construction Paper: This will be placed under the glass (If using plexiglass, this is not necessary.)

DIY Tripod
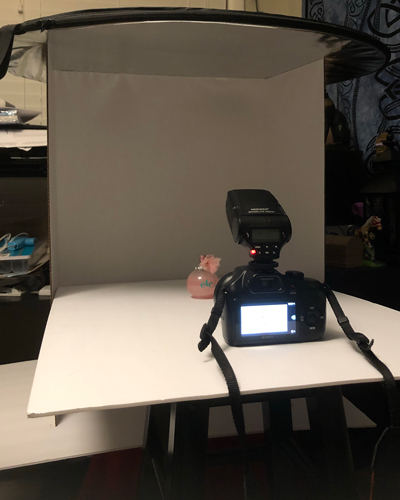
Flat Surface: You can use a table, or in this case, a stool (although, a table would probably have been smarter).
Choose Your Subject
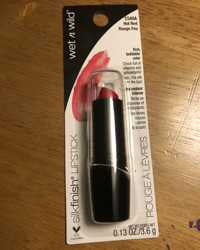
Product: For this example, I am using a Wet n Wild lipstick.
How to Set Up a DIY Photo Studio
The photo frame is not pictured, but it would sit UNDER the product, which creates a nice reflection of your product and gives the image some depth. You will see this feature in the final photo on my website.
You may want to set yours up on a table instead, but I didn't have any available, so I went with what I had (sometimes you have to work with what you've got!). Place your product with several inches of space between it and the display board. This will minimize your shadows. You may also want to set your camera on a tripod, level with your product. However, this is optional depending on the look you want. I just set my camera on the foam board that was acting as my table. (Tripods work great here as well.)
For my light source, I decided to use a standard speed light attached to my camera. The light is angled so it points up towards the DIY diffuser/reflector.
I played with my shutter speed and f-stop on my camera to get different lighting results. My favorite results were around 1/60 shutter speed and f-3.6. Remember, getting multiple shots of your product with different lighting options is useful if you are interested in doing a focus-stacked image. I used a Sigma 30mm f-2.8 lens.
Author’s note: For those that are unaware, f-stops are related to the depth of field focus. The smaller the f-stop, the less the product will be in focus. The higher it is, the more the product will be in focus. Playing around with different f-stops can give interesting looks to your image.
Also, if you do not have a light source, I found that the flash on the camera itself can work fairly well with this set-up. However, constant overhead light is fine if you have absolutely no lighting sources. Make sure to be conscious of any shadows your product may be casting. Another alternative would be to look into light painting.
<<<<<<<<<<< Want to see her final image? Check out Rachel's photography website to see her DIY product photography shoot along with other items she captured using this reflective surface.
View more of Rachel's work on Instagram.
Nossi College of Art's Photography Program teaches a variety of photography genres, career opportunities, video capabilities on your camera, and unique lighting techniques. Check the photography program curriculum to learn more.